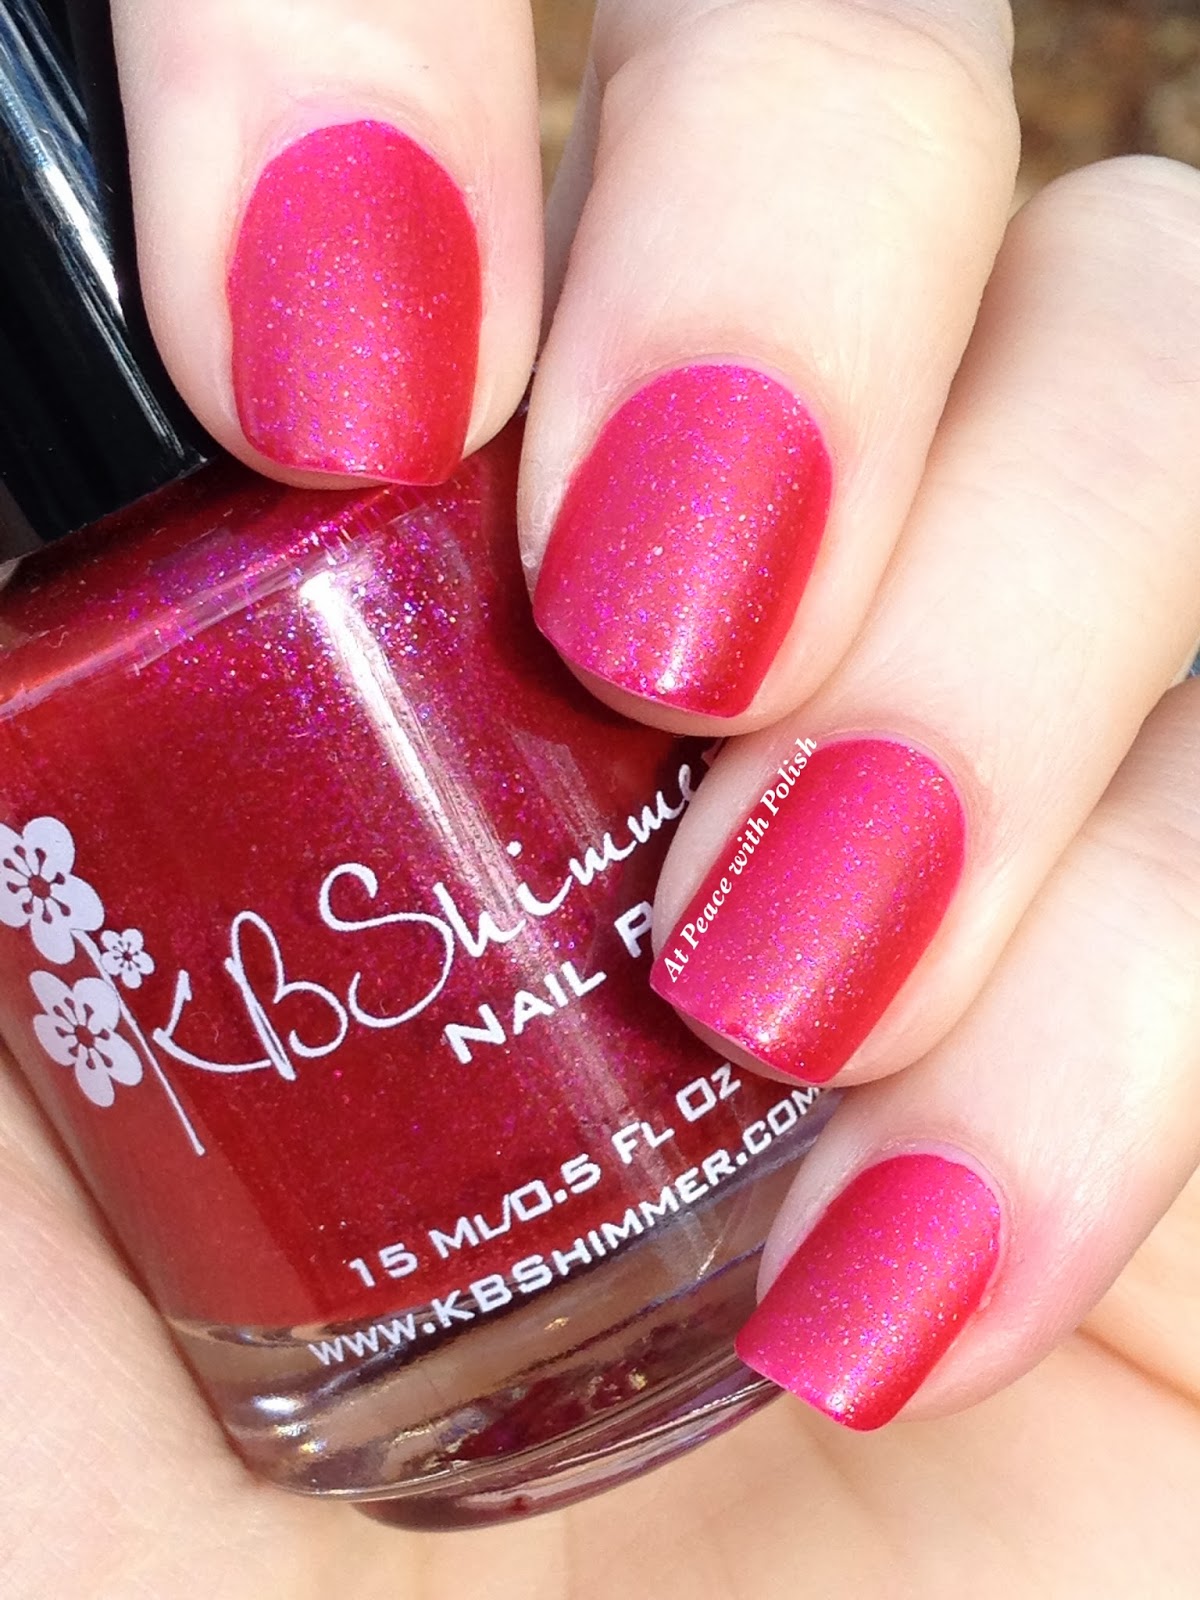
Here is a lovely polish from the KBShimmer Fall 2013 Collection! I wanted Every Nook and Cranberry from the moment I read about it on the press release info Christy sent with my Blogger package in August. My darling husband got it for me for Christmas! Woo!
This polish is described on KBShimmer.com as "a cranberry satin matte polish with a subtle pink and gold shimmer." I adore mattes and this one did not disappoint. Every Nook and Cranberry goes on in two flawless coats for full coverage and has a pretty rapid dry time. I oohed and ahhed over the gorgeous glitters and blue tones in this polish as I applied it and I really want to try it out with top coat!
Here is a DIRECT LINK to Every Nook and Cranberry on the KBShimmer shop website!! Go check out all the other gorgeous beauties she has up for sale. I have 19 different colors by Christy and they are of amazing quality and uniqueness!
Tuesday, December 31, 2013
Saturday, December 28, 2013
Emily de Molly Cosmic Forces
Good morning!
I just laid the little one down for his morning nap and looked over my blog a little. I am very sad to see that some of my photo quality is very poor!! They really lost their quality in translation from my iPhone app posting to the PC view.... I'm incredibly sorry about this!!!
Today I am working from the desktop and I want to show off another Emily de Molly to make up for my crappy pics before. This is the famous Cosmic Forces! I did take these photos inside, but I don't think they turned out badly.
What do you think of this one!? Love it!!
I just laid the little one down for his morning nap and looked over my blog a little. I am very sad to see that some of my photo quality is very poor!! They really lost their quality in translation from my iPhone app posting to the PC view.... I'm incredibly sorry about this!!!
Today I am working from the desktop and I want to show off another Emily de Molly to make up for my crappy pics before. This is the famous Cosmic Forces! I did take these photos inside, but I don't think they turned out badly.
This mani is two coats of this lovely, squishy purple jelly polish. I especially adore the big holo circles in there that just make the whole thing pop! My only issue with this polish is that where the big circles stick on my nails it always leaves a violet stain. It's still totally worth it!!! I use on coat of Seche Vite on top and it is nice and smooth. I have never had any glitter problems with Cosmic Forces, whether it be with placing the glitter or any catching.What do you think of this one!? Love it!!
Tuesday, October 22, 2013
I Love Emily de Molly!
And who doesn't?! If you don't know Emily de Molly Nail Colour you're missing out, my friends. This gorgeous Australian brand expands all the time but is never out of fresh ideas. I fell in love long ago with Cosmic Forces, Black Forest, and Zombie Spotting (which, unfortunately was LE and gone by the time I discovered it!). I finally got my hands on an EdM polish called Ursula from a blog sale and I knew I had to find a way to get more EdMs off my wish list and onto my shelf!
The lovely creation I want to share with you today was on its way to being discontinued when I finally caved and spent $13 plus shipping for it on www.shop.llarowe.com. If you're iffy about spending $13 on a bottle of nail polish, let me assure you that this is the brand you should splurge on! Have you heard "you get what you pay for?" Yep!
This is Regal Beginnings. If you know how much I adore purple you know I had to have this one!
This is two thin coats of Regal Beginnings. I kid you not, this polish was literally the smoothest application of a creamy, glitter-filled polish I have ever used!!! It was practically opaque with the first coat but I wanted to add depth with a second. This beauty manages to layer the glitter and base color so well that it shows the blue, gold, and black glitter while still stacking creamy layers.
Obviously this became one of my favorite colors ever. Ever. Ever. ;) I only took it off because my bestie got married this weekend and I painted my nails red to match!
Like I said, this is an Aussie based polish brand, but you can find it in online shops.
Ack!!! These photos make me want to put this color back on sooooooo badly!!!!!! ;)
Do you have any Emily de Molly Nail Colour?
Tuesday, October 15, 2013
Scratch Nail Wraps Review and Tutorial
PIC HEAVY TUTORIAL :)
Well around that time I also donated $9 to a neat little Kickstarter project founded by Chelsea Kent and called Scratch! These uniquely adorned wraps vary in availability from month to month. The Scratch site states, "Our goal with Scratch is to create amazing art for our nails, together. Teaming up with incredible nail artists, designers, bloggers and illustrators from around the world, we will bring a new collection of well designed nail wraps every month. Each month will be focused on the current Featured Artist. You'll be able to purchase their collection which will directly support the artist with a % of every sale."
Obviously I thought this sounded very cool! The project had already met its projected goal before it was suggested to me, but I felt that it was a good investment and I had no idea which wrap I would be getting - and who doesn't love surprises?
When my package from Scratch arrived it contained a cute green chevron set of wraps in several sizes, directions to locate their easy to follow instructions, and a cute mini file. I thought it was a good opportunity to do a basic tutorial for you all!
First you should make sure your nails are clean and dry. No base coat needed (and they didn't leave any damage!)
The next thing I had to do was pick the right size, of course. Next ya tear your strip off and start peeling! It's pretty cool, actually, the way it's made. The strip essentially comes apart in three pieces: the top plastic cover, the strip itself, and the thicker plastic cover over the adhesive. I found that it didn't really matter which I removed first.
Next you apply the strip against your cuticle. The adhesive is wonderful - sticky, yet forgiving if you have to move it to line up your wrap. The plastic is also nice and stretchy and shiny! The instuctions say to add a top coat but I wonder if it's really necessary....?
Press the wrap down over your nail to all the edges and make it stick. Here's where the file comes in handy! The instuctions say to file the extra length off in a downward motion - I had to file the bottom and sides on most of my tiny nails. I actually pressed the wrap down against my nail edge to begin sort of a tear, but DON'T just pinch it off! It will yank a little piece of the wrap off your nail that you don't want to lose. Trust me, I learned that the hard way!!!
Here is where I got frustrated. My nails are very tiny. For this reason I will not be using wraps anymore. The wraps are pretty uniform in their designs but in a way that the precut is designed for the strip size, not the nail size. Does that make sense? If you look at my pic of the finished mani you will see what I mean. It seemed to me that once done I had a sloppy mess of green. Some nails looked like I had applied them crooked or didn't use all the green colors, etc. Top it with your favorite top coat polish and you're all done.
Overall I thought this product was fantastic! They lasted until I took them off without any issues - much better wear time than Jamberry. Scratch even has a monthly subscriber box now. I adore this idea, but like I said, I think the art doesn't get portrayed well on my tiny nails. I would probably buy them as a gift though!!
You can't get these particular wraps anymore, but every month is something new! Go see what's up for October at www.goscratchit.com!
Naomi Rose
This polish was generously provided to me for review by Darah Patterson, owner and creator of Sweet Tea Polish. The provided polish is graciously accepted and kept, and does not affect my opinions regarding the product. This blog review post is my honest opinion for the owner's and any consumers' benefit. Thank you, Darah, for the opportunity to review these awesome polishes!
Sweet Tea Polish is so much fun! Today I have another color Darah calls Naomi Rose. Naomi Rose is described as an opalescent turquoise with pink, purple, aqua & silver glitter. I love how each color stands out independently from the base but in certain lights it all blends together. It sound strange, but it's just hard to describe! Pictures really don't do this creation justice.
I layered two thin coats over Sinful Colors Snow Me White for this mani and it got so many compliments at work! I adore looking at the shimmery color shift happening in this subtle shade! A must have for glitter lovers as well as the more conservative of polish wearers. There was no trouble applying this one, I just shook my bottle up and let it sit upside down for a little while before use and the glitter was very easy to grab.
See how it kinda looks like a glare on my nails and in the bottle? It's not! That's the turquoise standing out!
What do you think? I'm so happy to have this one! Once again here is the shop info for Sweet Tea Polish: You can purchase Sweet Tea Polish on etsy here for $9 a bottle plus shipping: http://www.etsy.com/shop/designsbydarah.
Monday, October 7, 2013
New Indie Brand! Sweet Tea Polish!
Sweet Tea Polish: "colors inspired by the Sweet South!"
This polish was generously provided to me for review by Darah Patterson, owner and creator of Sweet Tea Polish. The provided polish is graciously accepted and kept, and does not affect my opinions regarding the product. This blog review post is my honest opinion for the owner's and any consumers' benefit. Thank you, Darah, for the opportunity to review these awesome polishes!
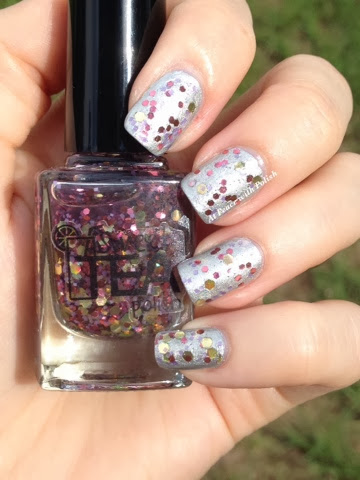
Today I want to share a new Indie Polish brand with you! Lovely Darah Patterson contacted me to review her southern inspired lacquers and I couldn't have been more excited! This initial set of colors is expansive and diverse and really showcases Darah's creativity.
A graphic designer by trade, Darah designed her own adorable Sweet Tea Polish labels and put together a super cute little package for me! I was so exited to find a very cool little set of bonus hairbands with my polish samples. Unfortunately I forgot to take some pics of them and I am at work, but since I have two great colors to show you I will be sure to have pics of them next time!
For now this is Barefoot Belle! This glitter topper shines with gold, rose, and lavender bits in different shapes and sizes depending on the color. I wasn't sure what the best color would be for under this one and it looked a little dark in the bottle so I went with a silver first. To me this does not show off the glitters at all! I made a huge mistake lol! The glitter is actually very lightly dispersed and the colors are bright and shiny and not dark at all.
So of course I corrected this mistake and did a little art!
This is Barefoot Belle over a gradient with e.l.f. Taupe of the World and Zoya Pepper! The gradient alone is pretty awesome and I will have to show you that another day!
Wednesday, September 18, 2013
Nice Planet!
This is two medium coats with no white undies. The polish is very opaque and super easy to work with - perfect formula and glitters in green, teal, and gold!
You can purchase Kunimitsu Nail Potions on etsy.com here: http://www.etsy.com/shop/Kunimitsu
If you have any of these up for swap or sale let me know, would ya?! I just adore these colors and can't wait to get more.
Subscribe to:
Posts (Atom)